



How to Install a Sunstrip on Your Car
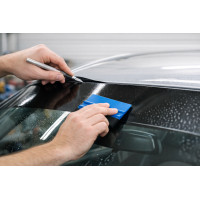
Installing a sunstrip is one of the simplest ways to give your car a sharper look while reducing glare on bright days. A well fitted sunstrip creates a clean, factory style finish and takes only a short time to apply when you follow the right steps. Our sunstrips are UK made using premium vinyl, which makes the installation smoother and helps the material settle cleanly on the glass without lifting or bubbling.
Before you begin, make sure the windscreen is completely clean. Any dust, residue or old adhesive will show through the vinyl once it is applied, so take a moment to wipe the glass with a microfibre cloth and a light cleaning spray. A clean surface gives the vinyl the best chance of bonding evenly and prevents small imperfections from becoming visible once the sunstrip is in place.
Measure the top section of your windscreen so you know exactly where the sunstrip will sit. Most people prefer a balanced look that follows the natural curve of the glass. Hold the sunstrip in position before removing the backing so you can check the height and alignment. This simple step avoids having to reposition the vinyl later, which is always harder once the adhesive has touched the glass.
When you are ready to apply, lightly mist the top of the windscreen with water. This gives you a small amount of movement and allows you to slide the vinyl into the perfect position before it bonds. Peel the backing from the sunstrip and place the vinyl gently onto the glass. I always recommend using a squeegee at this stage because it gives you the most control and helps you press the vinyl down evenly. Start from the centre and work outward, guiding the water and air toward the edges so the adhesive can settle smoothly.
Once the sunstrip is in place, trim it to the exact shape of your windscreen. Use a sharp blade and follow the edge of the glass carefully, taking your time to create a clean, even line. Trimming after application gives you a perfect custom fit and ensures the vinyl follows the natural curve of the windscreen without gaps or overhang. Premium vinyl cuts cleanly, so you can achieve a smooth edge with minimal effort.
Continue working across the surface with the squeegee, applying slow and steady pressure. This creates a clean finish and prevents air pockets from forming. If you notice a small bubble, guide it toward the edge rather than trying to press it flat. Premium vinyl is designed to release air gradually, so the material will settle naturally as you work. Once the sunstrip is fully applied and trimmed, leave it to dry. Avoid washing the car for at least twenty four hours so the adhesive can cure properly.
A well fitted sunstrip should look seamless from both inside and outside the car. If you have chosen a tinted or branded design, the premium vinyl will keep the edges crisp and the colour consistent over time. Our UK made sunstrips are designed to withstand weather changes, sunlight and regular cleaning, so once installed you can expect a long lasting finish.
If you are looking for a new sunstrip or want to upgrade to a cleaner, more modern style, our full range of UK made premium vinyl sunstrips are available in multiple colours and sizes to suit most vehicles. A simple installation can transform the look of your car and give you a sharper, more purposeful appearance on the road.